Adventures with 3D Printing
Introduction
In this article I share my experiences of researching, buying, and setting up an entry level 3D printer. I learned a lot along the way and wanted to share my experiences.
3D printers are just like inkjet printers, right?
No! There are some similarities but it's important to remember that 3D printer technology is not as mature as 2D printing technology. The physical mechanics involved in printing in 3D are more problematic than printing in 2D. 3D printers are a lot more like industrial machinery. There's a way to go before 3D printers are as easy to use as the 2D printers we all use today.
Which 3D printer to buy
I know it's a bit of a cop out, but the best advice is to do your research. There are numerous websites out there that compare and rate 3D printers.
If you're just experimenting and are not sure if 3D printing is for you then go cheap. Of course, you get what you pay for. Be prepared to upgrade to a more expensive model later if you want better quality 3D prints.
One major decision you'll need to make is whether to buy a filament printer or a resin printer. I'm not going to go into that here. There are numerous websites that explain pros and cons e.g. Resin or filament 3D printing: Which is best for you?. In the end I opted for a filament printer.
After doing my research, top of my list was the Original Prusa MINI+ but with a delivery lead time of 2-3 weeks that was a non-starter. In this age of next day delivery from Amazon, that's just not going to fly.
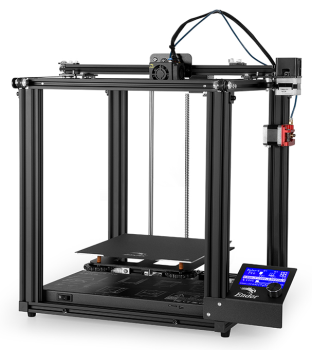
Second on the list was the Creality Ender Pro 5. Although I originally planned to go for the cheaper model, I was very fortunate to pick up a slightly better model for the same price in the sales.
Assembly
Most entry level printers come in kit form and require some level of assembly. Shipping the fully assembled printer would require a big box and a lot more packaging so it does make sense.
It's very much like an Ikea furniture kit. All the tools and assembly instructions are included. All the parts screw or plug in together, nothing complicated like soldering required.
The instructions from Creality were relatively easy to follow and included diagrams. Bear in mind that Creality is a Chinese company and English is not the first language. There were a couple of steps that I struggled with. If you struggle assembling Ikea furniture, you will most likely struggle with these instructions too!
My advice would be don't rush the assembly. Accept that it's not going to be a 5-minute job, take it slowly, read the instructions carefully, keep all the screws and parts organised as you go. Luckily, I got it right first time but there were a number of steps that I could easily have gotten wrong that would have been a pain to correct later on.
Printer placement - size and noise
Have a think about where you're going to put the printer once it's assembled. They tend to be physically big. The Ender Pro 5 is roughly the size of two averagely sized microwaves stacked on top of one another and as deep as wide.
The printer uses motors to very precisely move the printer head in three dimensions, so you'll want to put it on a flat, stable surface. Using an old wobbly table will likely result in poor prints. Luckily, I had an old Ikea coffee table that was exactly the right size and pretty robust.
Noise is something else to consider. It's quite loud when switched on, even when not printing. Along the lines of a hairdryer on a low setting or a microwave. The source of most of the noise are cooling fans, since the machine melts plastic, it gets quite hot. Apparently, you can buy quieter replacement fans but I haven't gotten that far yet. It might be a bit annoying if it's printing in the same room while you're trying to watch TV.
In conjunction with the noise is the time it takes to do a print. It depends on the size and nature of the model, but it can take hours for even relatively small models. I haven't printed anything especially large yet but we're talking many, many hours. Often, larger or complex models will be split into multiple smaller models which are glued together, a bit like an airfix model. Even so, be prepared for the printer to be running for long periods of time.
Monitoring prints
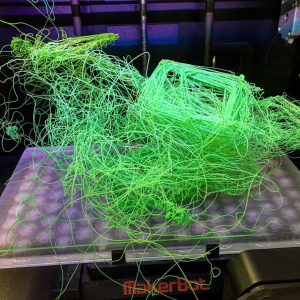
When printing any model, you'll want to periodically check how it's going. To cancel the print if something goes wrong. When it does go wrong you usually end up with what looks like a big ball of silly string.
Most often, the melted filament doesn't properly adhere to the model. Rather than melting into a solid model, new layers of filament just fall off. Once it starts going wrong there's usually no way back. If it's a large print you can waste a lot of filament if you don't stop the print quickly!
So far, in my experience the most critical point is the first few layers. The model is printed on a plate (technically they call it a bed). The first layer is printed directly on the bed and then subsequent layers are printed on top of one another to build up the 3D model. If the filament doesn't adhere to the bed or the first few layers, you're usually screwed. If it gets past the first few layers then the chances of a successful print increase considerably.
Again, so far, in my experience when this happens it's usually down to something called "bed levelling". On most entry level printers you have to manually calibrate the printer head. The head is a nozzle that melts the plastic filament and places it onto the model in layers. The head is attached to an arm that is moved around using motors during the print. The head needs to start at the right distance from the bed. The same distance from all parts of the bed, not just one point. If the printer head starts too close or too far away from any part of the bed then chances are the filament won't adhere to the surface.
So far, all my prints that have failed have succeeded after repeating the "bed levelling" calibration process.
There are high tech solutions to monitoring prints if you're up for it. Monitoring the print remotely via webcam. And even remotely cancelling/controlling the print using a Raspberry PI hooked up to the printer!
I ended up leaving mine in my front room at first so I could keep an eye on it. Later, I moved it to another room but would keep checking the progress of prints.
3D Models
You'll need to find digital 3D models to print on your new printer.
If you're intending to find existing 3D models on the internet then you'll need a bit of patience to find decent models. There are websites that list lots of models, many free. But it's all a bit disjointed and a bit of a minefield. The quality of models varies massively and not all 3D models are designed to be printed. Many are designed to be used in games.
Why does this matter? The problem is gravity! Remember that 3D printers print in layers, one on top of one another. The problem is when part of the model sticks out horizontally. Good models are carefully designed with this in mind. You can print outwards but there is a maximum angle that can be achieved. Otherwise, the model needs to include supports. This is where a vertical pole or similar is printed as scaffolding, so that the printer has something to print the horizontal part of the model onto. Once the model's printed, you'll cut off and discard the scaffold pieces.
Often, complex models are broken down into parts that are printed separately and glued together, which helps mitigate the gravity problem.
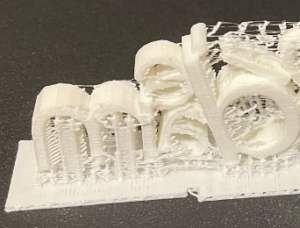
You can create your own 3D models too. Bear in mind that creating complex 3D models is not at all easy. And as mentioned, you need to take into account supports. Most 3D printers come with software that can automatically add scaffolding to your model but it's not always ideal.
I created a simple 3D model using MS Paint 3D and used the Creality software to automatically add supports. It added a LOT of supports that needed to be cut off. I had to spend a lot of time sanding down the surfaces to remove excess plastic after the supports, to get a smooth surface.